The loaf was still warm when someone slid it into the plastic box. By supper, the crust that had sung under the knife was a rubbery skin. By breakfast, the bread tasted like it had been politely suffocated. We talk a lot about good flour and long ferments, then sabotage the loaf in the last act.
Ask anyone who grew up with a proper bread crock, though, and they will tell you about a different kind of morning. A three-day-old loaf that still cracks faintly when you press it. A crumb that is settled, not stale. A kitchen that smells of toast rather than cold condensation. The trick is not another gadget. It is almost the absence of one.
The old method is painfully simple: wood and cloth, not plastic and clips.
Why plastic makes bread sulk
Bread goes stale in two main ways at once: it dries out, and its starches tighten and harden in a process called retrogradation. A sealed plastic box stops water from escaping, so the crumb stays damp for a while, but that moisture has to go somewhere. It migrates into the crust, softening what the oven worked so hard to make crisp.
Inside a box, the loaf sits in its own breath. The temperature swings of a modern kitchen make little clouds of condensation, then cool them on the inside of the lid. Crusts lose their crackle, flavours flatten, and within a day or so the bread has the odd, steamed taste of a sandwich kept too long in a school bag.
There is also the question of air. Bread does not need to be vacuum-packed between bakes. It needs a buffer. Bread hates being “perfectly sealed”; it prefers to be gently sheltered. This is where the old-fashioned method quietly shines.
The cloth-and-crock method
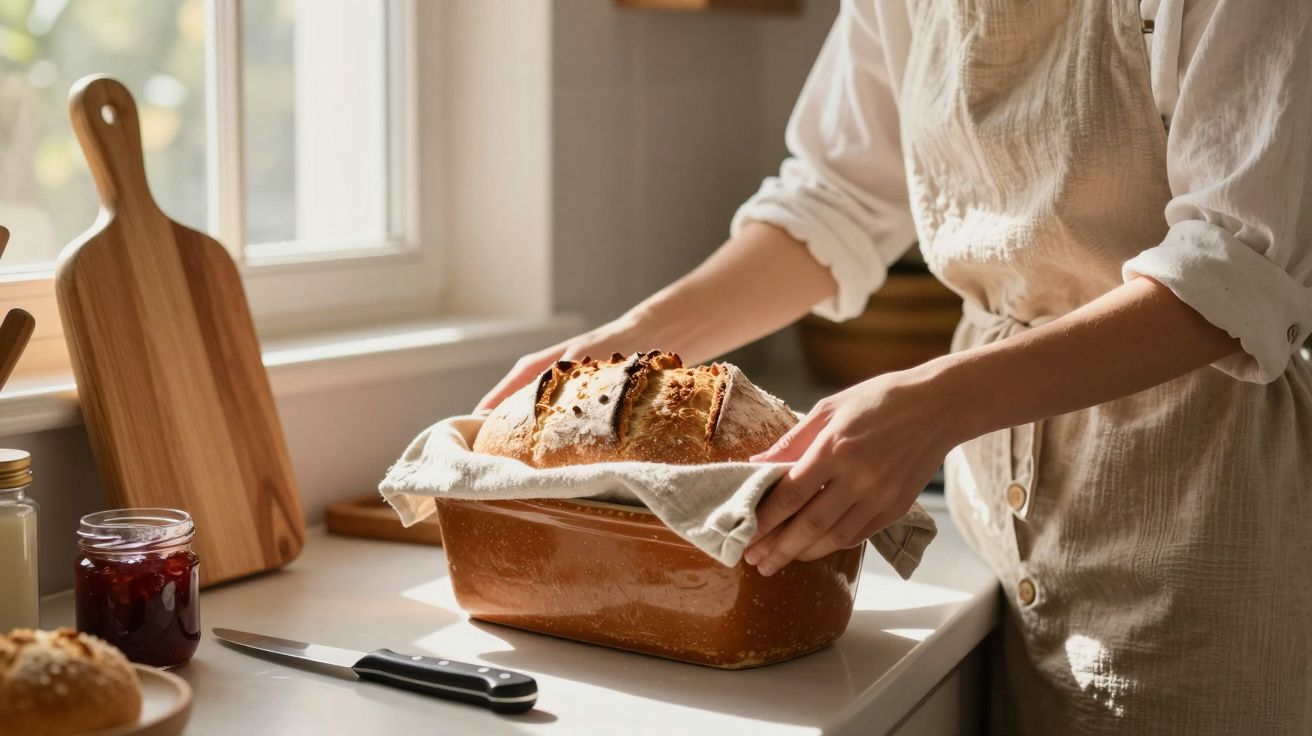
The classic set-up is almost embarrassingly low-tech: a breathable container and a clean bit of cloth. Think of a ceramic bread crock with a lid that does not clamp, a wooden bread bin with a loose door, or even a heavy pot with the lid resting slightly ajar. Inside, the bread sits either in a linen bag or loosely wrapped in a dry tea towel.
For a crusty loaf, you let it cool completely on a rack first - at least two hours, until no warmth steams from the cut. Then:
- Place the loaf cut-side down on a wooden board or inside the crock.
- Drape it with a cotton or linen cloth, or slip it into a cloth bag.
- Put the lid on, but do not seal any vents or gaps.
- Leave it at cool room temperature, away from direct sun or the hob.
Done this way, a good sourdough or country loaf will keep its crust lively for up to three days. The first day is still full crackle. The second day has a firm, toasty rim. Even on day three, the crust toasts back to life without turning to dry shards.
Let’s be honest: almost no one will fuss with hygrometers or exact cupboard temperatures. You do not need to. The combination of wood or ceramic plus cloth does most of the thinking for you.
How it actually works
In a breathable container, moisture can move, but not too fast. A little of the water in the crumb drifts outwards, but instead of slamming into a plastic wall and raining back onto the crust, it is absorbed by the cloth and slowly released into the air. The microclimate stays humid enough to stop the loaf drying to a stone, but dry enough that the crust is not soaked.
Wood and unglazed ceramic help by buffering humidity. They take on and give back tiny amounts of water vapour, smoothing out the peaks and troughs. A cloth around the loaf creates a small zone of still air right where it matters, which slows the staling from draughts without trapping steam.
The starches in bread will still rearrange over time - no method stops that entirely - but texture and flavour decline far more gracefully when the crust is not being constantly re-wetted. You are not trying to defeat staling; you are trying to steer it.
Making it work in your kitchen
You do not need a heritage bread crock to start. Look at what you already have that ticks three boxes: opaque, roomy, not airtight.
- A lidded casserole dish with the lid slightly ajar
- A wooden bread bin or deep drawer
- A heavy mixing bowl inverted over a loaf on a board
(with a folded tea towel between bowl and board)
Pair that with a cloth that feels more like a napkin than a fluffy towel. Linen or smooth cotton work best; they wick condensation without shedding fibres or odours.
A simple routine for a crusty loaf:
- Day 0 (bake or buy): Let the loaf cool fully. Do not bag it warm.
- Overnight: Store cut-side down, loosely covered with cloth in your chosen container.
- Day 1–2: Keep doing the same. Only slice what you need, leaving as much of the interior sealed by its own crust as possible.
- Day 3: If the crust feels too firm, mist it very lightly with water and reheat in a hot oven for 5–8 minutes. It will often come back singing.
For pre-sliced supermarket loaves, this method is less dramatic, because the thin crust was never built to last. But even then, a cloth-lined bin slows the slide into squishy ends and wet heels far better than a tightly closed plastic bag parked on a warm worktop.
Quick comparison of storage options
| Method | Best for | Trade-offs |
|---|---|---|
| Plastic box/bag | Very short-term softness | Soggy crust, faster flavour loss |
| Cloth + crock/bin | Crusty loaves (2–3 days) | Needs a bit of space and a cloth |
| Paper bag on counter | One-day holding, baguettes | Faster drying, especially in winter |
Small habits that change the loaf
A few small shifts make a bigger difference than another special container.
- Cool completely first. Warm bread in any container is a steam generator.
- Mind the cut face. Store the loaf cut-side down; the crust is your natural wrapper.
- Keep it out of the fridge. Cold speeds up starch retrogradation and gives you dry, chewy slices.
- Freeze smart. If you know you will not finish it in three days, freeze thick slices in a bag, then toast straight from frozen. Use the crock for what stays out.
You do not have to become dogmatic about it. If there are toddlers, housemates and packed-lunch chaos, sometimes the loaf will still end up in plastic for convenience. The old method works even if you only manage it on the weekends when there is time to care.
A wider take
A loaf that stays good for three days is less about thrift than rhythm. It means you can bake or buy once and eat well all week, instead of ricocheting between fresh miracles and resigned toast. It nudges you to cut thicker slices, to notice the day-two flavour, to honour the baker’s work past the first Instagram crumb shot.
Tech has made it easy to seal everything instantly. The cloth-and-crock method is a small refusal of that impulse, a way of saying that not every bit of food needs to be shrink-wrapped to feel safe. Bread is daily, humble, and worth a tiny ritual.
You could take this no further than swapping a box for a bin. Or you could let it be the start of paying more attention to how your kitchen air, your habits and your containers shape what you taste. Either way, the proof will be there the next morning, when the knife hits the crust and you still hear a little crack.
FAQ:
- Does this work for all types of bread? It works best for crusty loaves with a decent thickness of crust: sourdoughs, country whites, rye mixes. Very soft sandwich bread benefits less in terms of crispness, but still keeps its flavour and shape better than in steamy plastic.
- What if my kitchen is very hot or very dry? In hot, humid kitchens, use a thicker cloth and a more breathable container (wood over ceramic). In very dry homes, tuck the cloth a bit closer and avoid draughty spots so the loaf does not dry too fast.
- Can I leave bread just wrapped in a tea towel on the counter? Yes, for a day or so. After that, the cut face may dry too quickly. A loose container around the towel gives you a more stable environment for two to three days.
- Why not the fridge if I like cold bread? Refrigeration makes starch molecules set hard, so bread goes leathery even if it does not feel dry. If you want cold slices, store properly at room temperature, then chill just what you need shortly before eating.
- How do I revive a loaf that has already gone soft in plastic? Unwrap it, let the surface dry for 10–15 minutes, then bake directly on the oven rack at 200°C for 5–10 minutes. The crust will re-crisp, though it may not keep as long afterwards as a loaf never boxed in plastic.


Comments (0)
No comments yet. Be the first to comment!
Leave a Comment